 Instructions for working in the COBISS Lib application
The new generation of COBISS Lib software is a web application with the same functionalities as COBISS3, but with a new user interface. The application works in common web browsers and can be used on various devices, including tablets and mobile phones.
COBISS Lib, V13.0, supports functionalities like local COBISS3 applications, but in version V13.0 some functionalities are not yet implemented.
Simultaneous work in COBISS3 and COBISS Lib
For some time, it will still be possible to work in both COBISS3 and COBISS Lib, which means that changes, execution of procedures, etc. that were carried out in COBISS3 are also reflected in COBISS Lib and vice versa.
You can be logged in to either COBISS3 or COBISS Lib with the same username, which means that simultaneous work with the same username in both applications is not possible.
Below, you will find presentation of the following:
COBISS Lib is a web application. A powerful internet connection and the use of one of the more commonly used web browsers (e.g. Chrome, Firefox, Edge, etc.) are prerequisites.
Log in to the COBISS Lib application from the home page at the link https://bg.cobiss.net/bibl-rabotnici.htm, where in the COBISS Lib section you select the option Log in to the real environment. You enter the acronym or name of your library and then select your library from the drop-down list.
You can also log in to COBISS Lib by entering the web address https://cs.cobiss.net/clib/akronim/ in your web browser, where you enter the acronym of your library as an acronym - e.g. for the Maribor Library with the acronym SIKMB, the online address for application is https://cs.cobiss.net/clib/sikmb/.
After clicking on the link, the COBISS Lib login window will appear, where you enter the username and password, which are the same as for working in COBISS3:
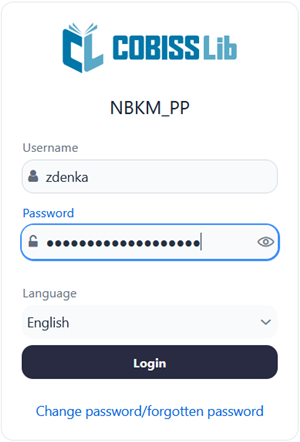
The work privileges are also the same as when working in a real COBISS3 environment.
Tips
Save the shortcut to access the COBISS Lib application to your favorite links or to your desktop so you can access your login faster.
Notes
Permission for pop-up windows in COBISS Lib: in order to perform all procedures in the COBISS Lib application (e.g. creating reports), it is mandatory to enable pop-up windows for the web address of the COBISS application in the web browser Lib.
Inactivity time in COBISS Lib and automatic logout: After one hour of inactivity in COBISS Lib, you will be automatically logged out of the application.
To use peripheral devices such as printers, RFID-panels, cash drawer, etc., the library must install the COBISS DGW service. This enables communication between the COBISS Lib application and peripheral devices.
The table below provides an overview of the devices and services used by the library or that the library offers to users. For each, the SERVICE COBISS DGW column indicates whether its installation is mandatory or not.
| Library service/equipment | COBISS DGW Service | Parameter in COBISS DGW | Note |
|---|---|---|---|
| Printers (labels, reports, lending forms/invoices) | YES | / | Simultaneous printing of lending forms, invoices, labels, statements, etc. |
| Bar code readers | NO | ||
| Tax Verification of Invoices | YES | Edit TaxXX | In COBISS DGW we install the certificate for the tax cash register. |
| Non-cash debt settlement outside of the library only | NO | ||
| RFID devices - material | YES | Manage Local Devices (RFID_book) | |
| RFID devices - membership cards | YES | Manage Local Devices (RFID_card) | |
| RFID - IZUM inventory | YES | Manage Local Devices (RFID_book) | |
| Cash register drawer | YES | ||
| Signature pad | NO | Installation of the web service signoPAD API. | |
| Security port | NO | ||
| Self-checkouts | NO | ||
| Parcel boxes | NO | ||
| Printing all reports only from .PDF format | NO | ||
| VALÚ | YES | Edit Valu | |
| POS terminal | Currently the use of the POS terminal is not integrated, but it can be used by entering the amount on the POS terminal. | ||
| Urbana | Not yet implemented. |
The process of installing the COBISS DGW service and editing the settings are described in the instructions Installation and Settings of the COBISS DGW Service.
Notes
You need administrator privileges to install the service on your workstation. This privilege is not required to edit individual settings in COBISS DGW.
The COBISS DGW service is only available for the Microsoft Windows operating system. It is also not possible to install it on mobile devices, so it is not possible to print immediately, settle debts, etc.
If we use network printers or a print server, a domain username and password must be used to log in to Cobiss3JettyService. This can be arranged during the installation of the COBISS DGW service according to the instructions Installation and Settings of the COBISS DGW service.
It is also mandatory to install the COBISS DGW service and, within this service, to install the certificate from the C:\Cobiss3Files\cert folder, if the library is liable for tax certification of invoices and wants to perform debts settlement in COBISS Lib. The procedure is described in the instructions Installation and Settings of the COBISS DGW Service.
If you are going to change the settings in the COBISS DGW service (e.g. installing a certificate for tax verification of invoices), you will need to log in to COBISS Lib again.
To use the signature pad in the COBISS Lib application, the signotec signoPAD-API/Web service must be installed. The service description and installation instructions can be found at the link https://en.signotec.com/software/integration-sdk-api-/signopad-api-web/. You can find the installation file at the bottom of this page in the section Links, where you select the option Download signoPAD-API/Web (V. 3.3.1).
In the window of the installation wizard that opens immediately after starting the installation, select the option localhost and 127.0.0.1 in the URL section.
Notes
You need administrator privileges to install the service on your workstation.
The use of the signature pad is supported in the Microsoft Windows operating system.
Working with files in the COBISS Lib application takes place in accordance with the functionalities of web browsers. Thus, in procedures where we need a file to perform the procedure (e.g. Update member details – import), we can only find it in the Select file window with the Select file… button or drag it from the place where it is saved and drop it into the provided frame.
In procedures where files are created as a result (e.g. Update member details – export or the Export to text file option in search engines), can we specify or change the storage location and enter the name of the downloaded file depending on your web browser settings. The default file storage location is most often the Downloads folder and the file usually also retains the name given by the application itself during the download.
Setting the web browser so that the user selects a location and enters a file name when downloading
In the settings of the web browser, look for the option Downloads and then mark the operation of the functionality Always ask where to save files.
Note
We recommend caution in procedures where we use files, as they are most often procedures where we change a large amount of data.
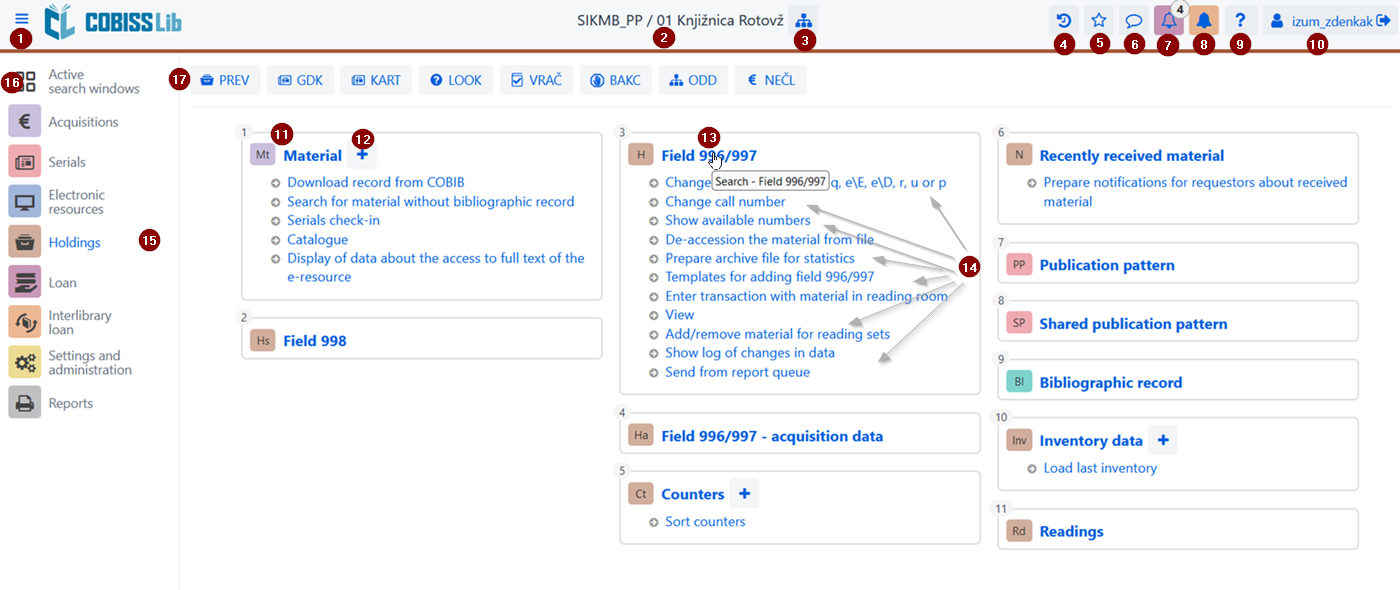
The COBISS Lib user interface consists of the following components:
The functionalities of the COBISS Lib main window are as follows:
The COBISS Lib search window combines search window and workspace elements. The list of found records represents the workspace for the selected content set and also enables the execution of procedures that can be performed with the selected record(s) in this set.
The search window offers the following options:
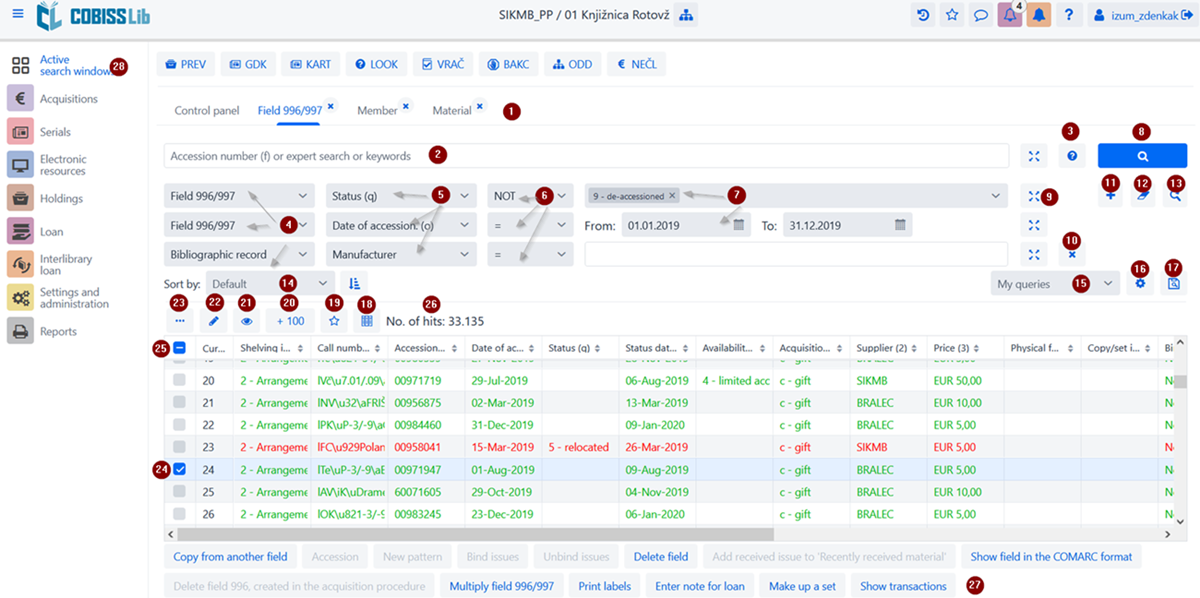
If the procedure for adding a new record is active in the content set, the Add  button will also appear before the Edit
  button. In the search window of the Material content set, there is also a Download record button for downloading a record from the shared database.
Selecting the desired range of hits
If you want to select only a range of hits (e.g. hits with consecutive numbers 8 to 15), you do it by doing the following:
Loading records into the search window
New record or the record with which we performed the procedures is uploaded to the top of the search window hits, i.e. as the first hit in the search window. At the same time, the added record is highlighted, and the program also moves us to this hit in the search window.
The components and options of the editor are:
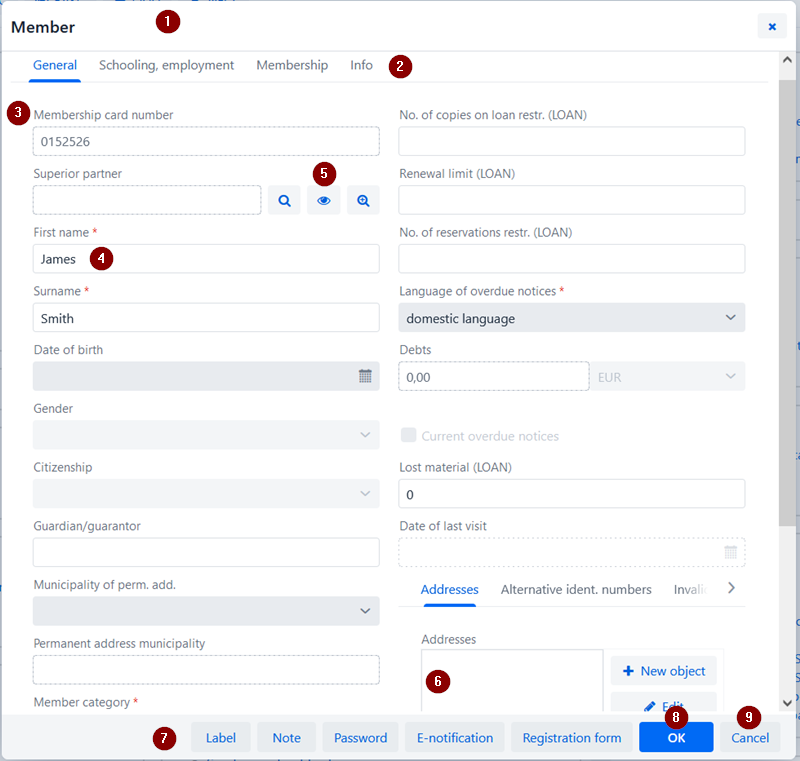

The COBISS Lib viewer allows you to view records and upload selected records to the active search window, shortcuts or history.
The components and options of the viewer are:
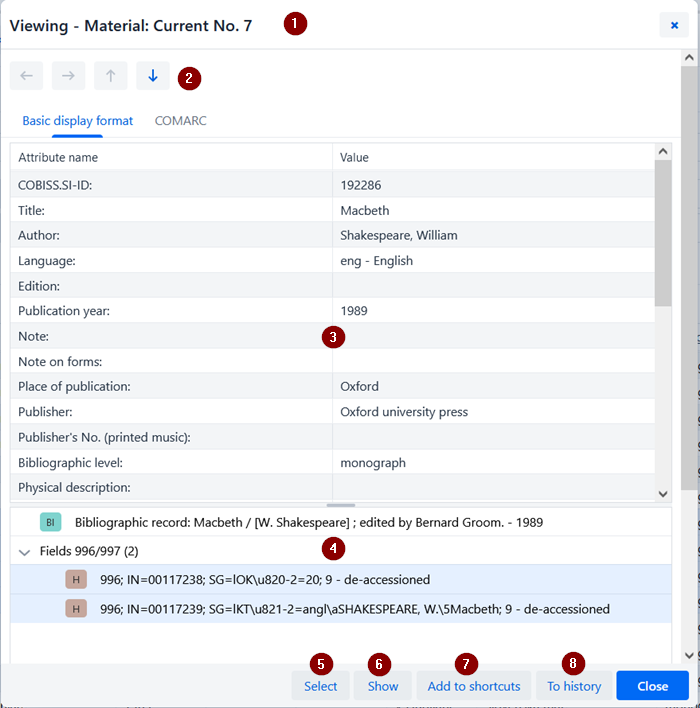
In active search windows, you can only upload records from the same content set at the same time. If, instead of an individual record, you mark the name of the linked content set among the linked records and then click on the Select button, a new window will open with a table of records in the linked content set. The options in this window are the same as those provided by the search window in the part where the search result is displayed.
The Reports module is placed at the same level as the other modules of the COBISS Lib application.
In the main window of this segment, the options are placed in individual tabs:
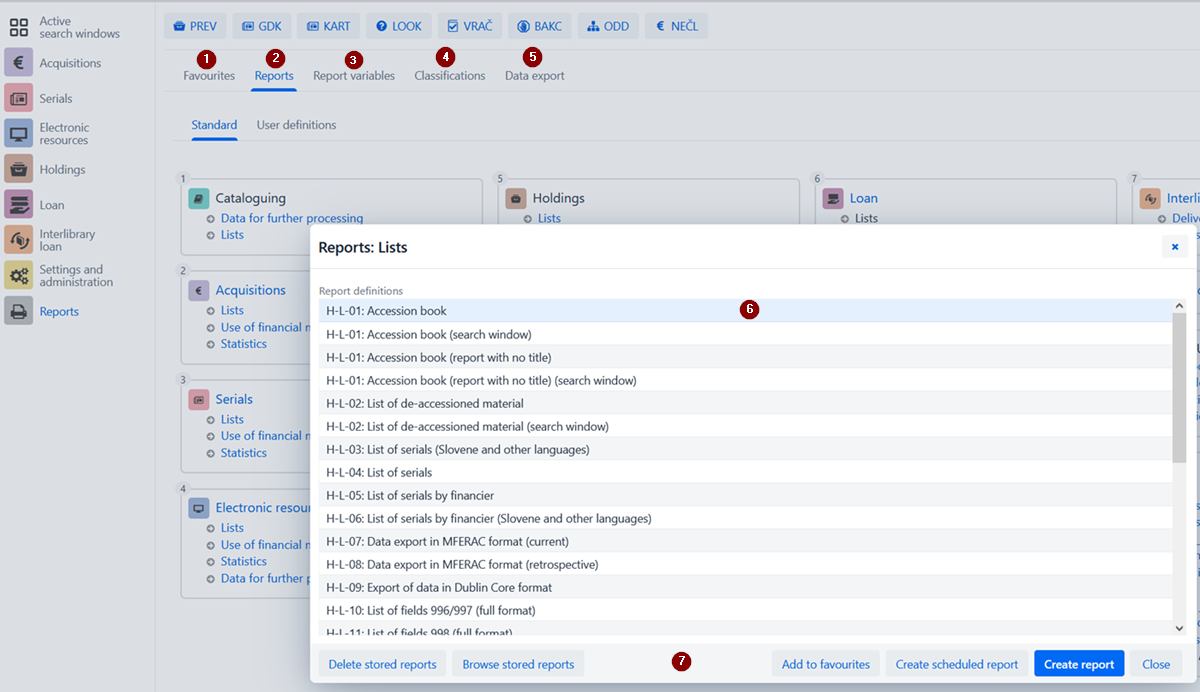
The tabs allow you to choose between the following options:
After clicking the name of an individual group of reports, variables, etc., a new window opens where you can choose between the procedures that each functionality enables. For example, select the report with which you want to perform something (6), after which the process is carried out by clicking the appropriate button (7) (e.g. the Create report button to perform report creation).
Clicking the  button opens the History window, which provides a review of records with which you performed procedures in your work.
Number of records in history
In history, a maximum of 500 records are kept, with which you carried out activities in your work. When this limit is reached, the records that were saved to the history first begin to be automatically deleted from the history.
In your work, you can add records from different content sets that you use often or repeatedly to shortcuts. You access them by clicking the  button. Records can be added to the shortcuts by selecting records in the search results in the search window and from the browser.
Number of shortcuts limit
The maximum number of saved shortcuts is 100. Once this limit is reached, records are no longer added to the shortcuts. In this case, records that are no longer relevant for frequent work should be deleted from the shortcuts.
In the Card window, you carry out procedures for recording material for the member and the department, and you can also access the member data editor and the library’s local material fund. This window replaces the Home library material window in COBISS3.
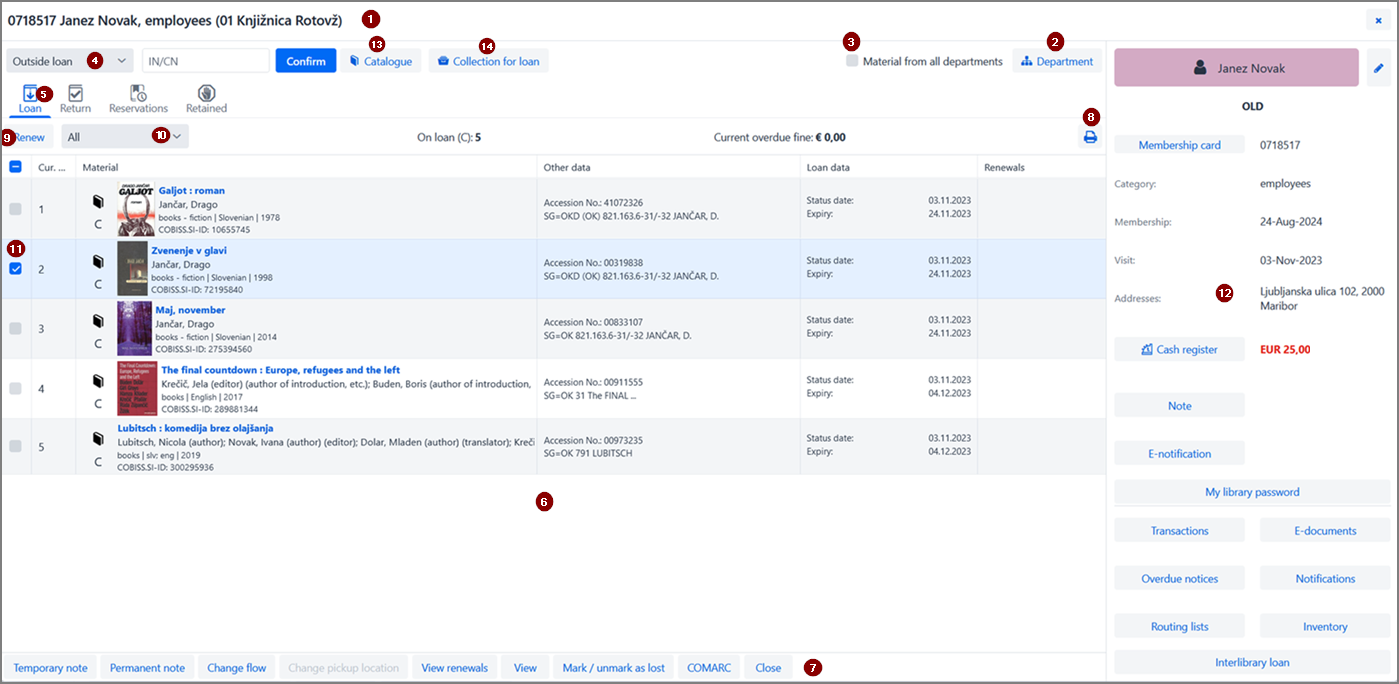
Access to performing procedures with material
Procedures that can be performed with the material are selected from the drop-down list – see no. 4 in the picture above. By clicking on the name of an individual tab, a procedure is activated in the drop-down list, which can be carried out on this tab – for example clicking on the name of the Loan tab activates the procedure Outside loan, clicking on the name of the Return tab activates the procedure Return/Delete, etc.
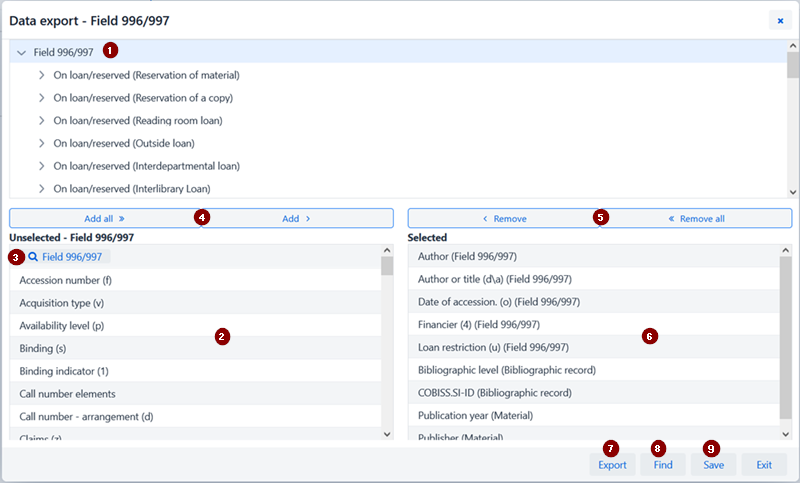
The data export functionality is accessed in the Reports module on the Data Export tab. On this tab, you can also access files with exported data.
Access to data export
To use this functionality, privilege to work in the Reports module is not required.
The main Data export window is designed in the form of a double window, where in the left window you select the data for which you want to export data, and you also select the option of preparing queries or filters. After clicking on Add or Add all, the data to be exported will move to the right window.
The functionalities in the data export window are as follows:
In COBISS Lib, you use the library catalogue in COBISS+ for the purposes of searching for material. After selecting the Catalogue procedure (e.g. in the card window), the catalogue in COBISS+ for the local database to which we are logged in opens. In the case of a library with departments, the catalogue for the department in which we are logged into in COBISS Lib is opened.
Material reservation
If you want to reserve material based on a selection from the COBISS+ catalogue, you do it by reviewing the detailed holdings data and copying the accession number of the material you want to reserve from there.
For the purposes of searching for material by the collection that the library has available for loan, access to the search window is enabled for this material from the Card window of a member or department by clicking on the Collection for loan button. You search through the material collection in the same way as you search for material in the search window Field 996/997.
Among the found copies of the material, you can mark one or more copies and perform the following procedures:
Search using the smart bar
In the first search field of the Collection for loan search window, you can search the material collection in the field Accession number (f) or expert search or keywords by entering the accession number, author or title of the material.
Note
In COBISS Lib, V13.0, the 1st version of the collection for loan search window is included, so all functionalities are not yet fully functional (e.g. saving default search fields, displaying set data, etc.). Additions are planned in the following versions.
In COBISS Lib, the window for editing the dates of issues receipts differs from the Publication calendar window in COBISS3:
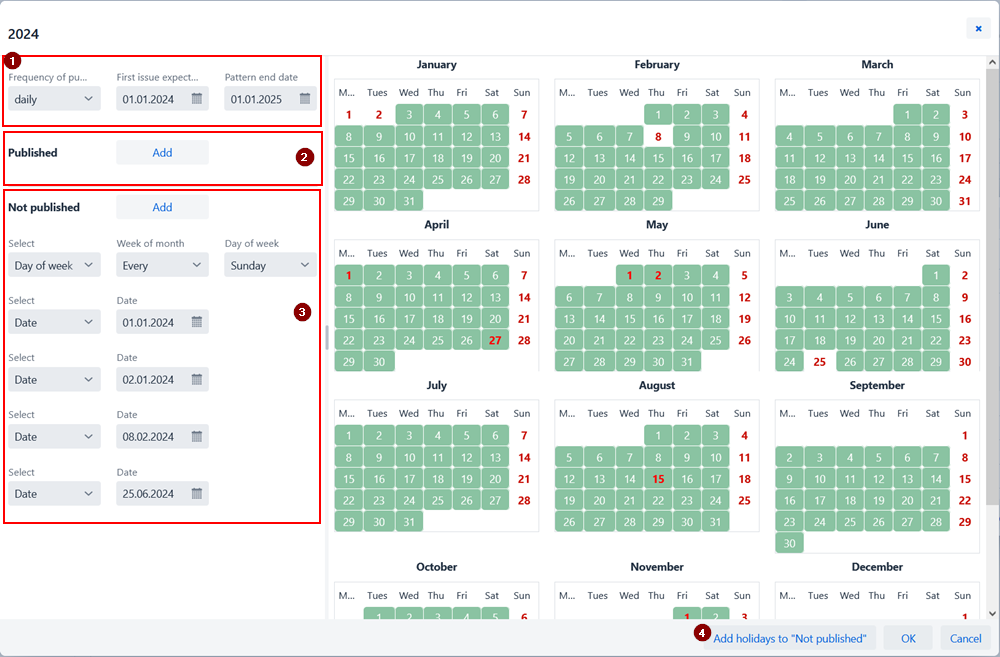
In the Settings and administration module, the functionalities of the segment COBISS3/Application management and the functionalities located in COBISS3 under option System are available.
In this module, there is also an option for setting hotkeys for performing procedures.
Access to the Settings and Administration module
Access to the module is enabled for all users, but special privileges are required for performing some procedures.
In the Settings and administration module, you edit the settings for the following content sets:
COLIB database search is also enabled.
To speed up work in COBISS Lib, you can set and activate buttons for quick access to performing of predefined procedures that you perform most often. You add the buttons and name them yourself and they are linked to the username.
Procedure
You can also edit the order of the buttons or delete them. These options are available in the command line of the Shortcuts editor for procedures window.
Hotkeys to change the section and open the GDK window
In COBISS Lib, access to the procedure for changing the library department is organized as a button in the title bar of the application window, and the Home library material method is replaced by the Card method. Therefore, for these two procedures for setting hotkeys in COBISS Lib are not supported, and both hotkeys, if you had them set in COBISS3, will be removed in COBISS Lib after saving the shortcut settings.
| Work area | Tips |
|---|---|
| Setting the display size in the interface | The display size can be adjusted with the Zoom option in the web browser. |
| Hide module names | By clicking on the icon  you can hide or click again to display the software modules again. This increases the workspace. you can hide or click again to display the software modules again. This increases the workspace. |
| Display area with open browsers ~ work area | In COBISS Lib, the workspace is replaced by search window functionality in COBISS Lib. Records with which you carry out actions are loaded into the search window section with search results displayed. This opens as many search boxes as there are content sets with which you implemented actions in COBISS Lib. This means that the records you worked with are collected by individual search windows. These search windows can be accessed by clicking on the icon  . . |
| Setting buttons for individual processes | For some of the most frequently implemented functionalities in the Settings and administration module in the 6 Settings content set, use the procedure Set up shortcuts for procedures to set the buttons to be placed under the COBISS address bar Lib. Buttons are visible in all modules. |
| Marking the record area in the search window, viewer | First, press and hold the <Ctrl> key and click on the line with the hit in the search window or record in the viewer, which should be covered as the first in the area that you want to mark; then press and hold the <Shift> key and click on the line with the hit or record, which should be marked as selected last. |
| Linked records | You can view linked records (e.g. in a search window) by clicking the button  , which opens the viewer of the selected record. The lower part of the window shows the linked reports that you can view, download, save to favorites or add to history. , which opens the viewer of the selected record. The lower part of the window shows the linked reports that you can view, download, save to favorites or add to history. |
| Downloading a record | When downloading a record, for the purposes of editing a limited set of data, the COBISS Cat application opens automatically (in a new browser tab), where the option Editing a limited set of bibliographic data. You edit and save the data, after which you close the web browser tab, because COBISS Cat opens in a new tab of the web browser for each record download. For faster access to the option to download records, a Download record button has been added to the Material search window, which enables this procedure to be carried out. |
| Home library material | The procedure Member / Home library material from COBISS3 is replaced in COBISS Lib by the procedure Card. |
| Catalogue on loan | In COBISS Lib it is replaced by Collection for loan option. This option is available in the Card window, where the Catalogue button is also available, which opens the library catalogue in COBISS+. The Catalogue procedure, which is available in the Material content set, also opens the library catalogue in COBISS+. |
| Settings and administration module | In this module, the functionalities of the segment COBISS3/Application Administration and the functionalities found in COBISS3 under the option System are available. |
| Data export | The Data export functionality is located in the Reports module on the Data export tab. The exported files can also be accessed in COBISS Lib with the option Files with exported data, which is available on this tab. Files are only kept for 7 days from creation, after which they are deleted. |
| Files with exported data | In the Files with exported data option, which is located on the Export data tab, files with reports that you have created and opened in PDF format are also available. Files are only kept for 7 days from creation, after which they are deleted. |
| Equipment | In COBISS Lib, the Equipment loan functionality is performed from the Card window of the selected member by clicking on the button in the right part of this window under the member information Equipment. Equipment information is visible in the Card window on the Equipment tab. |
| Printing problems | In case of printing problems (e.g. label or lending form is not printed), it is necessary to check: - order of logical destinations (module Settings and administration / section 6 - Settings / Logical destinations) - if the printer is locally or network connected (check with the administrator of your devices) - whether a special user has been configured for the needs of printing to network printers (check with the administrator of your devices) - operation of the COBISS DGW service (module Settings and administration / section 9 - Server / Test connection with COBISS DGW) |
Using the Back and Reload Page keys (Reload, F5) in a web browser when working in COBISS Lib
The Back and Reload Page keys reload the COBISS Lib application and return us to the control panel, all unsaved changes will be lost. Therefore, we do not recommend using these two options. We also pay attention to not having COBISS Lib open in more than one browser tab.
Functionality in the software can be implemented both in COBISS3 and in the COBISS Lib interface. This means that all changes made in COBISS3 will be immediately visible in COBISS Lib and vice versa (e.g. updated holdings data, changes in the member’s material records, etc.). When working in COBISS Lib, the parameter settings that were included for your library already for working in COBISS3 will be taken into account.
The process of implementing the functionality in COBISS Lib is as similar as possible to COBISS3, only the interface is different. This means that you can continue to use the user documentation prepared for COBISS3 in your work. Windows that are completely new (such as the Home library material window, which is replaced by the Card window in COBISS Lib) are briefly presented in the chapter Specially designed windows.
In contrast to the transition from COBISS2 to COBISS3, a special “transition” from COBISS3 to COBISS Lib will not be necessary and the following step swill not be necessary:
This means that you can start working in the COBISS Lib application immediately after installation. You decide for yourself which procedures you will start implementing in COBISS Lib first, and which ones later. However, we suggest that you start implementing the functionalities that you use most often in your work in COBISS Lib as soon as possible.
Simultaneous work in COBISS3 and COBISS Lib will be possible for some time.
The list of the main unsupported functions that are not yet supported in COBISS Lib is in the List of unsupported functions chapter. You continue to perform these procedures in COBISS3 instead of in COBISS Lib.
The main functions that are not yet supported in COBISS Lib V13.0 are listed below. We are constantly updating the list, as we are intensively working on the development of missing functions. You perform these functions in COBISS3.
support for material processing with RFID (accessioning using IZUM’s solution)
Interlibrary loan, Acquisition, Serials:
when entering data about the material, it is not possible to transfer data about the material from other (foreign) databases
COBISS Cat
COBISS Cat is a separate application. You can watch more in the clip presentation of the application at the COBISS conference and read in the Instructions for working in COBISS Cat.